Once your reports are created, integrations connected, and essential apps set up, the final step is making your reports live. This process is simple for free reports and slightly more detailed for paid products. Below is a clear walkthrough that covers every setup path – standard embed integrations, website builder shops, landing pages, and email delivery.
Making Free Reports Live
If you are offering reports for free, the setup is straightforward.
Skip the pricing step.
Go straight to your embed code or website builder and enable the report.
Publish/save the changes and your free reports will be instantly available.
Setting Pricing for Paid Reports
If you are selling your reports, you must assign pricing before making anything live.
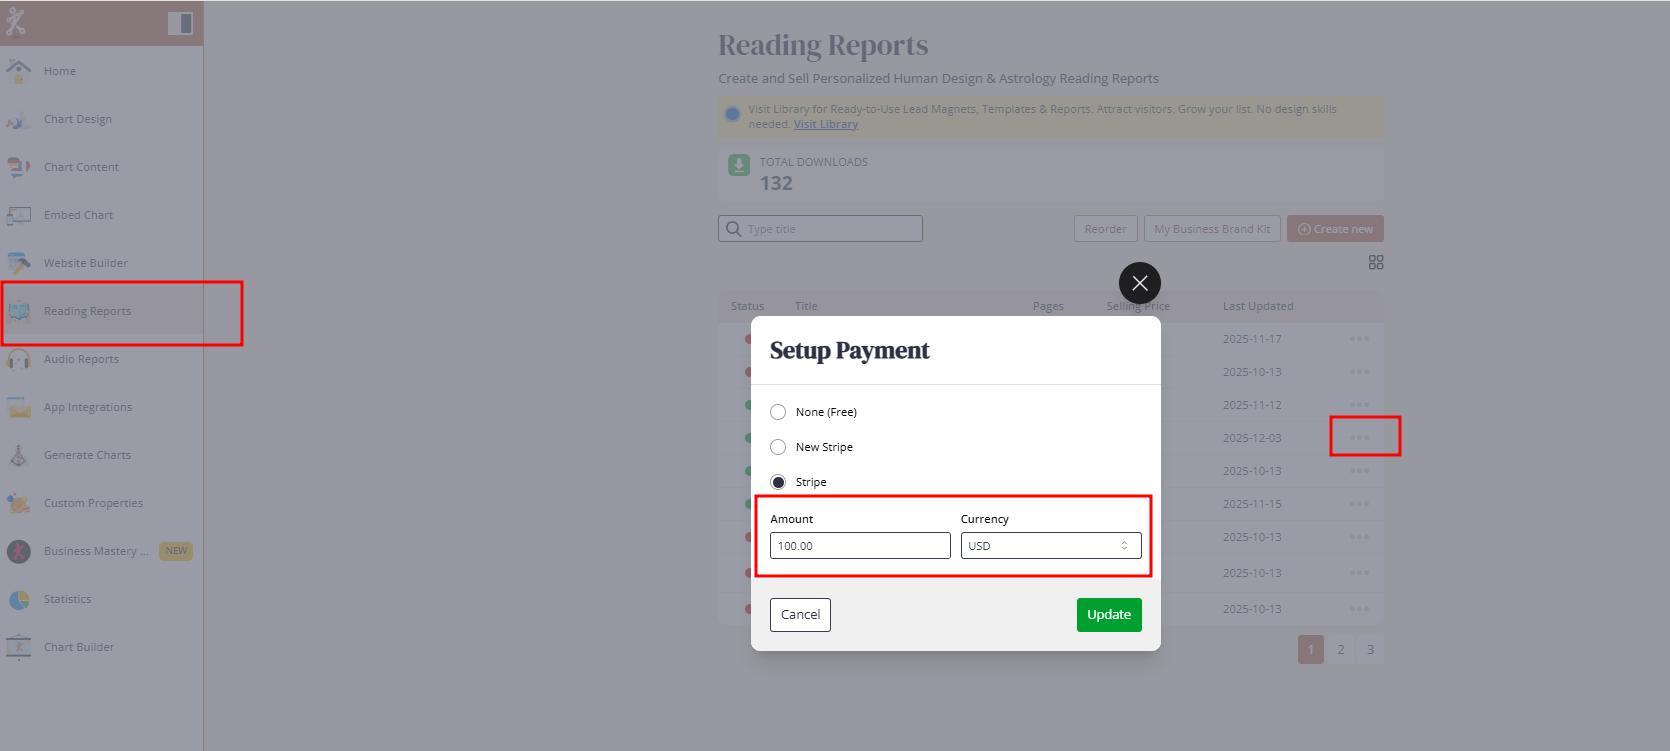
PDF Reading Reports
Open Reading Reports.
Select your payment app from App Integrations.
Set the price.
Choose your currency.
Click Update.
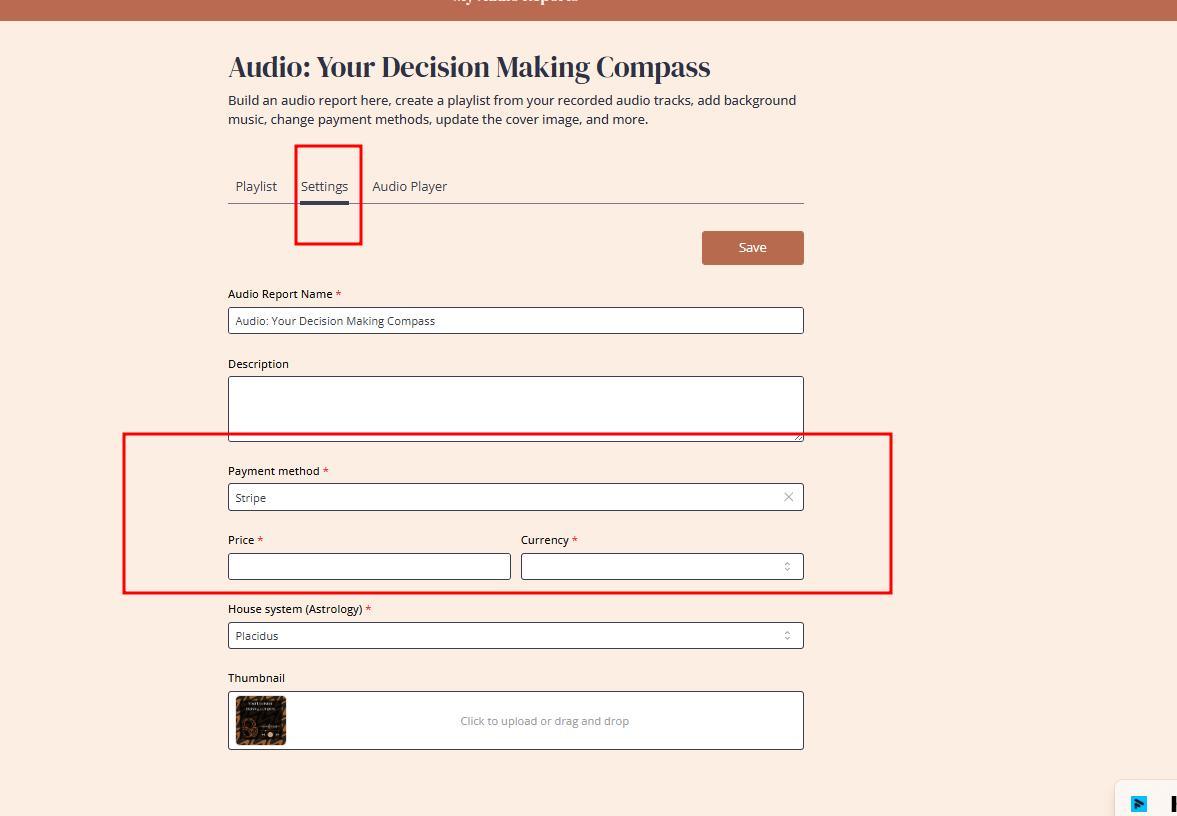
Audio Reports
Navigate to Audio Reports Settings.
Select your payment app.
Add price and currency.
Save the settings.
Once the price is assigned, you can move back to the integration or shop setup.
How Clients Purchase Through the Standard Integration
If you only use the external website with standard embed integration, the purchase flow is clean.
Client Journey
Client submits their birth data.
Chart generates for Human Design, astrology, or composite charts.
Report widgets appear instantly.
Client downloads a free report or clicks Buy Now for a paid one.
Client is redirected to your connected checkout app.
Important note – each report does not have a unique URL. Promotions always lead clients to the calculator because the system needs their data to assemble the correct, customized report using smart mapping.
Why External Checkouts (e-shops) Cannot Be Used
Subscribers often ask whether Shopify, WooCommerce, Squarespace or any other e-shop checkout can be linked to report widgets directly.
The answer is no. The report system depends on chart data and dynamic content mapping. Widgets cannot be connected to external carts.
Workaround – Use Website Builder as a Subdomain Shop
Many users:
Keep their main website on an external platform.
Create a shop on Bodygraph’s website builder as a subdomain.
Example: shop.yourdomain.com.
Hide unnecessary pages and use the builder only for product listings and checkout.
This gives you:
Unique URLs for individual reports.
Ability to run promotions directly.
Option for clients to add multiple reports to cart and check out all at once.
Best Practice – Use Both Methods
Mixing both systems increases visibility and sales.
Enable reports in your standard embed integration.
Also list them in the website builder shop.
More visibility means more purchases.
If you use only the website builder, enable reports both in the integration and in the shop so clients encounter them in multiple places.
Creating Dedicated Landing Pages with Unique URLs
If you do not want a full shop but still need standalone report pages for marketing, you can create a dedicated landing page.
How it works
Create a new embed code specifically for that report.
Duplicate your main design so colors match.
Hide all chart properties using CSS from the Help Center.
Embed the new integration code into your landing page.
When clients submit their data:
They will not see the chart or properties.
They will only see the report widget and checkout button.
This is ideal when:
Running promotions.
Selling a single signature report.
Offering limited-time free downloads.
Creating password-protected event pages.
You can create as many embed codes and landing pages as needed. More information and video tutorial can be found here.
Increasing Report Sales Through Visibility and Design
To maximise conversions:
Make reports easy to find. Avoid too long funnels.
Place widgets above the chart, not below.
Upload eye-catching thumbnails for both PDF and audio reports.
Avoid hiding access to reports in deep menus.
The fewer clicks, the better the conversion rate.
Setting Up Email Delivery for Report Purchases
Some browsers block pop-ups, which means clients may fail to download the report directly after purchase. To avoid delivery issues, always enable email delivery.
Two options:
Use Bodygraph’s system domain.
Use your own domain by adding two TXT records to your DNS.
Full guide on email setup can be found here. And email template editing guide can be found here.
Test Everything Before Selling to Clients
Before offering any paid reports for your clients:
Set your report price to one dollar.
Test the entire flow yourself.
Confirm money arrives in your account.
Confirm download works.
Confirm email delivery works.
! Never offer paid reports without testing the sales journey yourself firts.
If the setup is incorrect and traffic is high, you may need to deliver orders manually, which quickly becomes overwhelming. Therefore testing and confirming the success of setup is essential.
Also check video tutorial below:
Still have questions? Is above guide outdated? Please message us on Live Chat or send an email to support@bodygraph.com.